 Theo Bailey
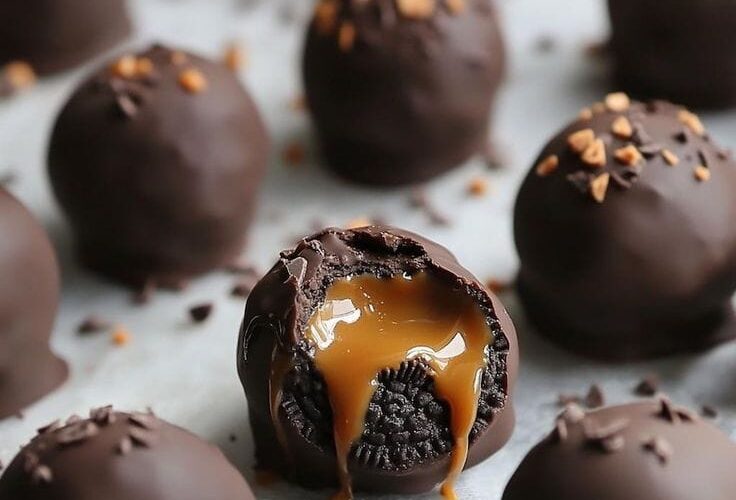
In the world of easy, no-bake desserts, few treats can claim the perfect storm of simplicity, decadence, and universal appeal quite like the Peanut Butter Oreo Cookie Ball. Imagine the rich, chocolatey crunch of an Oreo cookie, seamlessly blended with the creamy, salty-sweet goodness of peanut butter, all enrobed in a luxurious coat of smooth melting chocolate. It’s a bite-sized piece of heaven that requires no oven and minimal effort, yet delivers maximum satisfaction.
This comprehensive guide will walk you through everything you need to know to create these irresistible confections. We’ll cover the simple ingredients, the foolproof step-by-step process, and pro tips for dipping and decorating that will make your cookie balls look as professional as they taste. Whether you’re a baking novice or a seasoned chef looking for a quick fix, this recipe is about to become your go-to for parties, potlucks, or a well-deserved personal treat.
Why This Recipe is a Guaranteed Hit
Before we dive into the ingredients, let’s talk about why this recipe is so special:
- No-Bake Convenience: Perfect for hot summer days or when you need a dessert without turning on the oven.
- Minimal Ingredients: With just a handful of pantry staples, you can create a dessert that tastes incredibly complex.
- Crowd-Pleasing Flavor: The combination of chocolate and peanut butter is a timeless classic that appeals to all ages.
- Make-Ahead Magic: These balls freeze beautifully, making them perfect for getting a head start on holiday baking or party prep.
Gathering Your Ingredients: Simple & Effective
The beauty of this recipe lies in its simplicity. You only need a few core ingredients to create magic.
Core Ingredients:
- 1 package (14.3 oz or 403g) Oreo Cookies: Regular Oreos are classic, but feel free to experiment with flavors like Mint or Peanut Butter Oreos for a twist.
- 1 package (8 oz or 225g) Cream Cheese, softened to room temperature: This is the binding agent that gives the balls their smooth, firm-yet-creamy texture. Full-fat is recommended for the best consistency.
- 1/2 cup (125g) Creamy Peanut Butter: Use a standard, no-stir peanut butter like Jif or Skippy. Natural peanut butter that separates can make the mixture too oily.
- 1 teaspoon Pure Vanilla Extract (optional): This enhances all the other flavors and adds a subtle depth.
For the Chocolate Coating & Decoration:
- 2 cups (12 oz or 340g) Semi-Sweet or Milk Chocolate Chips: You can also use dark chocolate or vanilla almond bark.
- 1 tablespoon Coconut Oil or Vegetable Shortening: This is a pro secret! Adding a small amount of fat to your melting chocolate makes it thinner, more fluid, and creates a beautiful, smooth, crack-free shell.
- Optional Toppings: Crushed Oreos, Sprinkles, Crushed Peanuts, Flaky Sea Salt, or Drizzled White Chocolate.
Essential Equipment:
- Food Processor
- Large Mixing Bowl
- Electric Hand Mixer or Stand Mixer
- Baking Sheets
- Parchment Paper or Wax Paper
- Heatproof Bowls (for melting chocolate)
- Spoons or Forks for dipping
- Toothpicks (optional, but helpful)
The Step-by-Step Guide to Perfect Cookie Balls
Follow these steps carefully, and you’ll have a flawless batch of Peanut Butter Oreo Cookie Balls every single time.
Step 1: The Crumb Foundation
- Process the Oreos: Place the entire package of Oreo cookies (filling included!) into the bowl of a food processor. Pulse until the cookies have been transformed into a uniform, fine crumb. No large chunks should remain.
- Transfer to Bowl: Pour the Oreo crumbs into a large mixing bowl.
Pro Tip: If you don’t have a food processor, place the Oreos in a large, sealed zip-top bag and crush them with a rolling pin until they resemble fine sand.
Step 2: Creating the Perfect Filling
- Combine Wet Ingredients: To the bowl with the Oreo crumbs, add the softened cream cheese, creamy peanut butter, and vanilla extract (if using).
- Mix Thoroughly: Using an electric hand mixer (or a stand mixer with the paddle attachment), beat the mixture on medium speed until everything is perfectly combined. It should look like a uniform, dark, and creamy dough. Scrape down the sides of the bowl to ensure no dry crumbs are left behind.
Pro Tip: Do not overmix! Once it’s combined, stop. Overmixing can warm up the cream cheese and make the dough sticky.
Step 3: Chilling for Success
- Cover and Chill: Cover the bowl with plastic wrap and refrigerate for at least 30 minutes. This crucial step firms up the dough, making it much easier to roll into neat balls and preventing them from falling apart during the dipping process.
Step 4: The Rolling Phase
- Prepare Baking Sheets: Line two baking sheets with parchment or wax paper.
- Portion and Roll: Using a small cookie scoop (about 1 tablespoon in size), portion out the dough. Roll each portion between your palms to form a smooth, round ball. Place each ball on the prepared baking sheet.
- Second Chill: Once all balls are rolled, place the baking sheets in the freezer for about 15 minutes. A very cold ball is the secret to a smooth, easy chocolate coating.
Step 5: The Art of Chocolate Coating
- Melt the Chocolate: Combine the chocolate chips and coconut oil in a heatproof bowl. Melt in 30-second intervals in the microwave, stirring vigorously after each interval, until the chocolate is completely smooth and fluid. Alternatively, you can use a double boiler on the stove.
- Dip the Balls: Remove a few balls from the freezer at a time (keeping the rest cold). Using a fork, a dipping tool, or even two spoons, submerge each ball completely in the melted chocolate. Gently tap the fork on the edge of the bowl to allow the excess chocolate to drip off.
- Return to Sheet: Carefully place the coated ball back onto the parchment-lined baking sheet.
- Add Toppings Immediately: If you are adding sprinkles, crushed nuts, or a pinch of flaky sea salt, do it NOW, before the chocolate sets.
Step 6: The Final Set
- Allow to Harden: Once all balls are dipped and decorated, allow them to sit at room temperature until the chocolate shell is completely firm and set. This can take a few hours. To speed up the process, you can place the trays back in the refrigerator for about 20 minutes.
Storing and Serving Your Masterpiece
- Storage: Keep your Peanut Butter Oreo Cookie Balls in a single layer in an airtight container in the refrigerator for up to 1 week.
- Freezing: These are excellent for freezing! Place the fully set balls in a single layer on a baking sheet to freeze solid, then transfer to a freezer bag or container. They will keep for up to 3 months. Thaw in the refrigerator before serving.
- Serving: Serve them chilled straight from the fridge for the best texture and flavor.
Creative Variations to Try
Don’t be afraid to get creative! This recipe is a fantastic canvas for experimentation.
- White Chocolate Raspberry: Use Golden Oreos, mix in a tablespoon of raspberry jam instead of peanut butter, and coat with white chocolate.
- Cookies and Cream: Omit the peanut butter and use only cream cheese for a pure Oreo flavor. Coat in white chocolate and sprinkle with Oreo crumbs.
- Mint Chocolate: Use Mint Oreos and coat in dark chocolate for a refreshing, sophisticated treat.
- Nutty Delight: Roll the finished balls in finely chopped peanuts for an extra crunch.
Conclusion: Your Path to No-Bake Bliss
There you have it—the complete guide to creating utterly Delicious Peanut Butter Oreo Cookie Balls. This recipe proves that you don’t need complex techniques or a long list of ingredients to create a dessert that wows. It’s a testament to the power of a few quality ingredients combined with a little bit of love and patience.
So, gather your Oreos, cream cheese, and peanut butter, and prepare to impress your friends, family, and most importantly, yourself. Happy no-baking