
Easy Make-Ahead Breakfast Sandwiches (Freezer Friendly)
Breakfast on-the-go just got easier! If you’re tired of rushing in the morning or skipping breakfast altogether, these make-ahead breakfast sandwiches are your new best friend. Not only are they delicious, but they’re also freezer-friendly, so you can prep a batch ahead of time and enjoy a hearty, homemade meal in minutes.
Whether you’re a busy parent, a student with a packed schedule, or someone who just loves a good breakfast sandwich, this recipe is perfect for you. Plus, they’re customizable—swap in your favorite ingredients to suit your taste. Let’s dive into how to make these easy freezer breakfast sandwiches that will save you time and keep you fueled all week long.
Why You’ll Love These Make-Ahead Breakfast Sandwiches
These sandwiches aren’t just convenient; they’re also packed with flavor and nutrition. Here’s why you’ll adore them:
- Time-Saving: Spend just 20 minutes assembling a batch, then freeze them for up to 3 months. Reheat in seconds!
- Budget-Friendly: Buying ingredients in bulk and making your own sandwiches is far cheaper than grabbing fast food on the go.
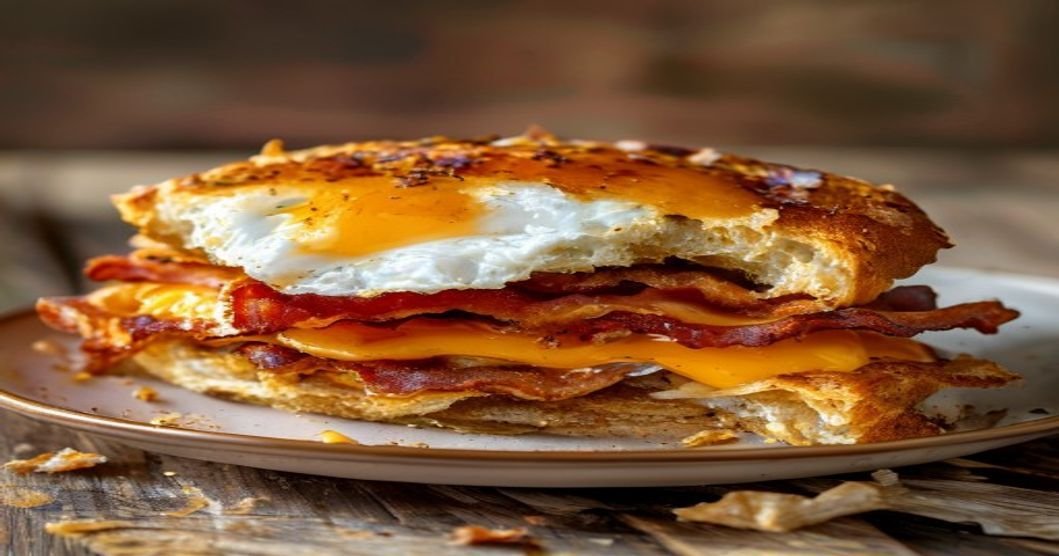
- Customizable: Use your favorite bread, cheese, eggs, and meats (or veggies for a vegetarian option).
- Portable: Perfect for meal prep, work lunches, or road trips.
- Kid-Approved: Let your little ones pick their favorite fillings—they’ll actually look forward to breakfast!
No more skipping the most important meal of the day. With these freezer breakfast sandwiches, you’ll always have a delicious and filling option ready to go.
Ingredients You’ll Need
Here’s what you’ll need to make a batch of 8-10 sandwiches. Adjust quantities based on how many you want to prep.
Basic Ingredients
- 8-10 English muffins (or bagels, biscuits, or sandwich thins)
- 8 large eggs
- 1/2 cup milk (or half-and-half for extra creaminess)
- Salt and pepper to taste
- 1 tbsp butter or oil (for cooking eggs)
- 8-10 slices of cheese (cheddar, American, or your favorite)
- Optional: Cooked breakfast meats (sausage, bacon, or ham)
Optional Add-Ins
- Sautéed bell peppers and onions
- Fresh spinach or avocado
- Hot sauce or sriracha for a spicy kick
- Everything bagel seasoning for extra flavor
- Sliced tomatoes
Feel free to mix and match ingredients based on what you have on hand. The beauty of these sandwiches is their versatility!
Step-by-Step Instructions
1. Cook the Eggs
In a large bowl, whisk together eggs, milk, salt, and pepper until well combined. Heat a large skillet over medium heat and melt the butter. Pour in the egg mixture and cook, stirring occasionally, until soft scrambled (about 3-4 minutes). Remove from heat and set aside.
2. Toast the English Muffins
Slice the English muffins in half and lightly toast them if desired (this prevents sogginess when reheating).
3. Assemble the Sandwiches
Lay out a sheet of parchment paper or aluminum foil. Place the bottom half of an English muffin on the foil. Add a slice of cheese (and cooked meat if using), followed by a layer of scrambled eggs. Top with another slice of cheese and the other half of the English muffin. Press down gently to secure the fillings.
4. Wrap for Freezing
Wrap each sandwich tightly in plastic wrap, then place it in a resealable freezer bag or airtight container. Label with the date to keep track of freshness.
Pro Tip: For extra protection against freezer burn, wrap each sandwich in foil before placing it in the plastic wrap.
5. Freeze and Store
Store the sandwiches in the freezer for up to 3 months. They’ll be ready whenever you need a quick breakfast!
How to Reheat Your Breakfast Sandwiches
The best part about these sandwiches? They’re just as delicious reheated as they are fresh. Here’s how to do it:
Microwave Method (Quickest Option)
- Remove the sandwich from the freezer and unwrap it.
- Place it on a microwave-safe plate and cover with a damp paper towel (this keeps the bread from drying out).
- Microwave on high for 60-90 seconds, or until the cheese is melted and the egg is warm.
- Let it sit for 30 seconds before eating—it’ll be piping hot!
Toaster Oven or Oven Method (Crispier Option)
- Preheat your toaster oven or oven to 350°F (175°C).
- Place the frozen sandwich directly on the rack or a baking sheet.
- Bake for 10-15 minutes, or until the bread is crispy and the cheese is melted.
- For extra crispiness, flip the sandwich halfway through cooking.
Skillet Method (Best for a Fresh-Cooked Taste)
- Heat a skillet over medium heat and add a small amount of butter or oil.
- Place the frozen sandwich in the skillet and cook for 3-4 minutes on each side, until the bread is golden brown and the cheese is melted.
- This method gives the sandwich a fresh-cooked taste with a crispy exterior.
Note: Avoid reheating in the toaster if your sandwich contains cheese—it can make a mess!
Tips for the Best Make-Ahead Breakfast Sandwiches
Follow these tips to ensure your sandwiches turn out perfectly every time:
Choose the Right Bread
English muffins are classic, but you can also use:
- Bagels: Toast them well to prevent sogginess.
- Biscuits: Great for a Southern-style breakfast sandwich.
- Sandwich Thins: Lower in carbs but still sturdy enough for fillings.
- Croissants: For a buttery, flaky option (best eaten fresh or lightly toasted).
Prevent Sogginess
- Toast the bread lightly before assembling.
- Use a paper towel to blot excess moisture from cooked meats or veggies before adding them.
- Avoid overloading the sandwich with wet ingredients like tomatoes or avocado (add these fresh when reheating).
Make Them Healthier
- Swap the bread: Use whole wheat English muffins or low-carb tortillas for a lighter option.
- Add veggies: Spinach, mushrooms, or bell peppers add nutrients without extra calories.
- Use egg whites: For a lower-fat option, replace whole eggs with egg whites or a mix.
- Choose lean meats: Turkey sausage or Canadian bacon are great alternatives to pork sausage.
Freeze Like a Pro
- Freeze sandwiches individually to make it easy to grab just one.
- Use freezer-safe bags or containers to prevent freezer burn.
- Label your sandwiches with the date and type (e.g., “Sausage, Egg & Cheese”).
Reheat Properly
- Always reheat from frozen—thawing can make the bread soggy.
- If using the microwave, cover the sandwich with a damp paper towel to retain moisture.
- For best texture, use the skillet or oven method at least once a week.
Variation Ideas: Customize Your Sandwiches
One of the best things about this recipe is how adaptable it is. Here are some delicious variations to try:
1. Classic Breakfast Sandwich
- English muffin
- Scrambled eggs
- Cheese (American or cheddar)
- Sausage patty or bacon
2. Veggie Lover’s Sandwich
- Whole wheat English muffin
- Scrambled eggs with spinach and diced bell peppers
- Swiss or pepper jack cheese
- Avocado slices (add fresh when reheating)
3. Breakfast BLT
- Toasted sourdough bread
- Fried or scrambled eggs
- Crispy bacon
- Lettuce and tomato (add fresh when reheating)
- Mayo or aioli
4. Egg & Cheese with Everything Bagel Seasoning
- Bagel halves
- Scrambled eggs
- Cream cheese or cheddar
- Everything bagel seasoning
5. Caprese Breakfast Sandwich
- Ciabatta roll
- Scrambled eggs with fresh basil
- Mozzarella cheese
- Sliced tomatoes and pesto (add fresh when reheating)
6. Breakfast Taco Style
- Tortilla
- Scrambled eggs with taco seasoning
- Shredded cheddar or pepper jack
- Cooked chorizo or sausage
- Salsa and avocado (add fresh when reheating)
Get creative and mix and match ingredients to find your perfect combo!
Time-Saving Meal Prep Ideas
Want to make the process even faster? Try these meal prep shortcuts:
Pre-Cook Your Meats
Cook a large batch of sausage patties, bacon, or ham ahead of time and store them in the fridge for up to 5 days. Freeze them in portions for easy grab-and-go options.
Pre-Chop Your Veggies
Dice onions, bell peppers, and spinach in advance. Store them in airtight containers in the fridge so they’re ready to add to your eggs.
Use Pre-Shredded Cheese
Save time by using pre-shredded cheese from the store. Just make sure to choose a variety that melts well (like cheddar or mozzarella).
Batch Cook Your Eggs
Instead of scrambling eggs one at a time, cook a large batch in a skillet or sheet pan. Divide the eggs into portions and freeze them separately before assembling the sandwiches.
Invest in a Good Freezer
If you’re prepping a large batch, make sure your freezer has enough space. Consider using a deep freezer if you plan to stock up regularly.
Nutritional Benefits of Breakfast Sandwiches
While breakfast sandwiches aren’t always known for being the healthiest option, these homemade versions can be a nutritious start to your day. Here’s how:
- Protein-Packed: Eggs and cheese provide high-quality protein to keep you full and energized.
- Fiber-Rich: Whole wheat bread or English muffins add fiber, which aids digestion.
- Healthy Fats: Avocado, nuts, or lean meats contribute healthy fats for brain function.
- Customizable: You control the ingredients, so you can avoid excess sodium, sugar, or unhealthy fats.
- Balanced: A well-made breakfast sandwich includes protein, carbs, and healthy fats for a balanced meal.
For a lighter version, opt for egg whites, whole grain bread, and plenty of veggies. For a heartier meal, add avocado, nuts, or extra protein.
Frequently Asked Questions
Can I make these sandwiches without eggs?
Yes! Swap the eggs for mashed avocado, hummus, or a spread like cream cheese. You can also use tofu scramble for a vegan option.
How long do they last in the freezer?
These sandwiches will stay fresh in the freezer for up to 3 months. For best quality, consume them within 1-2 months.
Can I reheat them in the toaster?
It’s not recommended, as the cheese can melt and make a mess. Stick to the microwave, skillet, or oven for best results.
What’s the best way to thaw them?
You can thaw sandwiches overnight in the fridge or reheat them directly from frozen. Thawing isn’t necessary, but if you prefer, microwave them for 20-30 seconds before reheating.
Can I use gluten-free bread?
Absolutely! Use gluten-free English muffins, bagels, or bread to make these sandwiches gluten-free.
Do they taste good cold?
While they’re best reheated, you can eat them cold if you’re in a pinch. The texture might be softer, but the flavors will still be delicious.
Final Thoughts: Why You Should Start Prepping Breakfast Sandwiches Today
Make-ahead breakfast sandwiches are a game-changer for busy mornings. They’re easy to make, customizable, and freezer-friendly, saving you time, money, and stress. Whether you’re meal prepping for the week or just looking for a quick breakfast option, these sandwiches are a must-try.
So, why not give them a shot? Gather your ingredients, set aside 20 minutes, and enjoy the convenience of a homemade breakfast every day. Your future self will thank you!
Call to Action: Start Your Breakfast Sandwich Prep Today!
Ready to transform your mornings? Here’s what you can do next:
- Pick your recipe: Choose a variation from this post or create your own!
- Gather ingredients: Check your fridge and pantry for what you already have.
- Set aside time: Dedicate 20-30 minutes to prep a batch for the week.
- Freeze and label: Store your sandwiches properly so they’re ready when you need them.
- Share your creations: Tag us on social media with your favorite breakfast sandwich combo—we’d love to see your tasty results!
Don’t let busy mornings derail your breakfast routine. With these easy make-ahead breakfast sandwiches, you’ll always have a delicious, satisfying meal ready to go. Happy prepping!