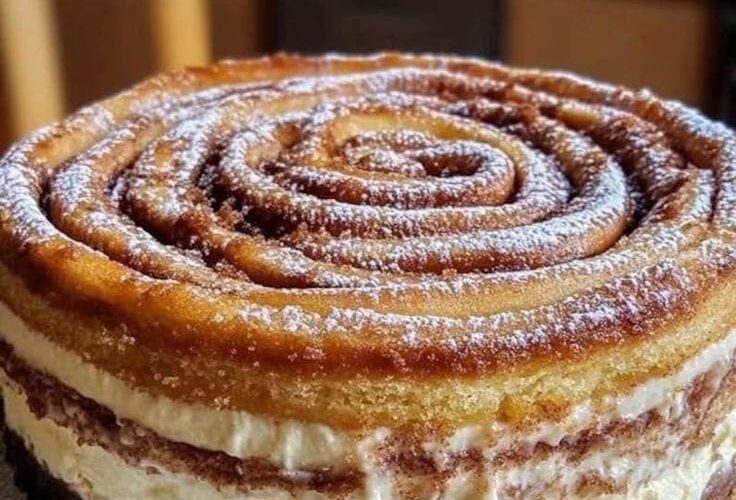
A Match Made in Dessert Heaven
Imagine the warm, gooey, and spicy-sweet comfort of a freshly baked cinnamon roll. Now, picture the dense, moist, and irresistibly sweet charm of a classic honeybun. Finally, envision the rich, creamy, and tangy luxury of a perfectly baked New York-style cheesecake. What if you could have all three in one breathtaking bite?
Welcome to the world of Cinnamon Roll Honeybun Cheesecake—a dessert that is more than the sum of its parts. This recipe is for those who believe that indulgence is an art form. It’s a show-stopping centerpiece for holidays, a guaranteed hit at potlucks, and a deeply satisfying project for any home baker looking to create something truly extraordinary. This guide will walk you through every step to create this masterpiece, ensuring a perfect blend of flavors and textures that is sure to earn you rave reviews.
Why This Recipe Works: The Science of Sweetness
The genius of this cheesecake lies in its layered approach to texture and flavor.
- The Crust: Instead of a traditional graham cracker base, we use canned cinnamon roll dough. This provides a soft, bread-like foundation that soaks up the flavors from the honeybun and cheesecake layers, preventing a soggy bottom.
- The Filling: The honeybun layer acts as a sweet, dense ribbon running through the creamy cheesecake. It introduces a distinct honey-cinnamon flavor and a delightful chewiness that contrasts beautifully with the smooth cheesecake.
- The Cheesecake: A classic, velvety cheesecake batter, slightly tangy from the cream cheese, balances the intense sweetness of the other components. It acts as the creamy, unifying element that brings everything together.
This combination ensures that every forkful is a complex experience: creamy, chewy, soft, and spiced, all at once.
Essential Tools You’ll Need
- 9-inch Springform Pan (crucial for easy removal)
- Stand Mixer or Hand Mixer
- Large Mixing Bowls
- Rolling Pin
- Measuring Cups and Spoons
- Spatula
- Aluminum Foil (for the water bath)
- Roasting Pan or larger baking dish (for the water bath)
Cinnamon Roll Honeybun Cheesecake Recipe
Yields: 12-16 servings
Prep Time: 45 minutes
Bake Time: 1 hour 15 minutes + 5 hours cooling
Ingredients
For the Cinnamon Roll Base & Swirl:
- 2 (8-count) cans of refrigerated cinnamon roll dough (16 rolls total)
- All-purpose flour (for dusting)
For the Honeybun Layer:
- 4-5 store-bought honeybuns, unfrosted
- ¼ cup (½ stick / 57g) unsalted butter, melted
- 2 tablespoons brown sugar
- 1 teaspoon ground cinnamon
For the Cheesecake Filling:
- 4 (8 oz / 226g) blocks full-fat cream cheese, room temperature
- 1 cup (200g) granulated sugar
- 1 cup (240ml) full-fat sour cream, room temperature
- 3 tablespoons all-purpose flour
- 4 large eggs, room temperature
- 1 tablespoon pure vanilla extract
For the Cream Cheese Frosting & Topping:
- The included icing from the cinnamon roll cans
- 4 oz (½ block / 113g) cream cheese, softened
- 1 cup (120g) powdered sugar
- 2-3 tablespoons milk or heavy cream
- ½ teaspoon vanilla extract
- A pinch of salt
- Optional: Extra cinnamon for dusting, chopped pecans or walnuts
Step-by-Step Cooking Instructions
Step 1: Prepare the Cinnamon Roll Crust
- Preheat your oven to 350°F (175°C). Grease the bottom and sides of a 9-inch springform pan.
- Open the cans of cinnamon rolls. Set the icing packets aside for the frosting later.
- On a lightly floured surface, unroll all 16 cinnamon rolls. You will now have long, flat strips of dough.
- Press these strips of dough into the bottom of the prepared springform pan, creating a solid, even layer that completely covers the base. Ensure there are no major gaps. Use your fingers to press the seams together. Set the pan aside.
Step 2: Create the Honeybun Ribbon
- Cut the honeybuns into small, bite-sized cubes (about ½-inch).
- In a medium bowl, toss the honeybun cubes with the melted butter, brown sugar, and cinnamon until they are evenly coated.
- Evenly distribute this honeybun mixture over the layer of cinnamon roll dough in the springform pan, pressing it down gently.
Step 3: Make the Cheesecake Filling
- In the bowl of a stand mixer fitted with a paddle attachment (or using a hand mixer), beat the softened cream cheese on medium speed until it is completely smooth and free of lumps. This should take about 2-3 minutes. Scrape down the bowl.
- Gradually add the granulated sugar and beat until fully incorporated and creamy.
- Beat in the sour cream and vanilla extract.
- Sprinkle the flour over the mixture and beat on low speed until just combined.
- With the mixer on low, add the eggs one at a time, mixing until just combined after each addition. Do not overmix once the eggs are in, as this can incorporate too much air and cause the cheesecake to crack.
- Pour the finished cheesecake batter over the honeybun layer in the springform pan. Use a spatula to smooth the top.
Step 4: Bake the Cheesecake in a Water Bath
- Tightly wrap the outside bottom and sides of the springform pan with a double layer of heavy-duty aluminum foil. This is to prevent water from seeping in.
- Place the foil-wrapped pan into a large roasting pan. Bring a kettle of water to a boil.
- Carefully pour the hot water into the roasting pan until it comes about halfway up the sides of the springform pan.
- Gently transfer the entire setup to the preheated oven.
- Bake for 1 hour and 15 minutes. The edges of the cheesecake should be set, but the center should still have a slight jiggle—like Jell-O—when you gently shake the pan.
- Turn off the oven, crack the oven door open, and let the cheesecake cool inside the oven for 1 hour. This gradual cooling is the best defense against cracking.
Step 5: Cool and Chill
- After the hour in the oven, remove the cheesecake from the water bath and place it on a wire rack to cool completely to room temperature. This may take another 1-2 hours.
- Once cooled, run a thin knife around the edge of the cheesecake to loosen it from the pan, but do not remove the springform ring yet.
- Cover the pan with plastic wrap and refrigerate for at least 4 hours, but preferably overnight. This allows the flavors to meld and the texture to firm up perfectly.
Step 6: Prepare the Frosting and Serve
- About 30 minutes before serving, make the frosting. In a medium bowl, beat the softened 4 oz of cream cheese until smooth.
- Add the reserved icing from the cinnamon roll cans, powdered sugar, vanilla, and a pinch of salt. Beat until combined.
- Gradually add the milk or cream, one tablespoon at a time, until you reach a smooth, drizzle-able consistency.
- Remove the chilled cheesecake from the refrigerator. Unlatch and carefully remove the springform ring.
- Drizzle the cream cheese frosting generously over the top of the cheesecake. Optionally, sprinkle with a little extra cinnamon or chopped nuts.
- Use a sharp knife, dipped in hot water and wiped dry between each cut, to slice clean pieces. Serve immediately and enjoy the symphony of flavors!
Pro Tips for the Perfect Cheesecake
- Room Temperature is Key: Ensuring your cream cheese, eggs, and sour cream are at room temperature prevents a lumpy batter and ensures a silky-smooth texture.
- Don’t Overmix: Over-beating the batter after adding the eggs incorporates air, which leads to a puffy cheesecake that is prone to cracking as it cools.
- The Water Bath is Non-Negotiable: The steam from the water bath creates a humid environment that cooks the cheesecake gently and evenly, preventing cracks and yielding that legendary creamy texture.
- Patience is a Virtue: The long, slow cooling and chilling process is crucial for the structure and flavor of the cheesecake. Rushing this step will result in a messy slice.
This Cinnamon Roll Honeybun Cheesecake is more than a dessert; it’s an experience. It’s a love letter to classic comfort sweets, reinvented with elegance and care. So, preheat your oven and get ready to bake a legend.


