
There’s a certain nostalgia that comes with a slice of warm banana bread. For many, that familiar aroma filling the kitchen is more than just a scent; it’s a culinary hug. However, for those managing blood sugar levels, following a diabetic-friendly lifestyle, or simply aiming to reduce refined sugar intake, traditional banana bread can be a minefield. Standard recipes often pack 25 to 30 grams of sugar per slice—nearly the entire daily recommended limit in a single snack.
At Vegiplate, we believe you shouldn’t have to choose between your health and your favorite comfort foods. We’ve spent weeks in the kitchen “cracking the code” to create a loaf that is truly moist, naturally sweet, and perfectly kind to your insulin levels. This isn’t just a quick recipe; it’s a masterclass in healthy transformation.
The Health Imperative: Why Go Low-Sugar?
The movement toward low-sugar living isn’t just a trend; it’s a metabolic necessity for millions. Excessive refined sugar is linked to chronic inflammation, weight gain, and increased risk of Type 2 diabetes. For our diabetic community, a “hidden” sugar spike from a piece of bread can lead to fatigue, thirst, and long-term health complications.
By shifting to a low-sugar model, we utilize the Glycemic Index (GI) to our advantage. Lower GI foods break down slowly, offering a steady stream of energy rather than a frantic spike and crash. This banana bread is designed to be a “slow-burn” fuel source, rich in fiber and healthy fats, making it a safe indulgence for almost any dietary plan.
The Science of Sweetness: Understanding Our Ingredients
To replace the bulk and moisture of sugar, we have to get scientific with our pantry. Here is why our specific ingredient list works so well:
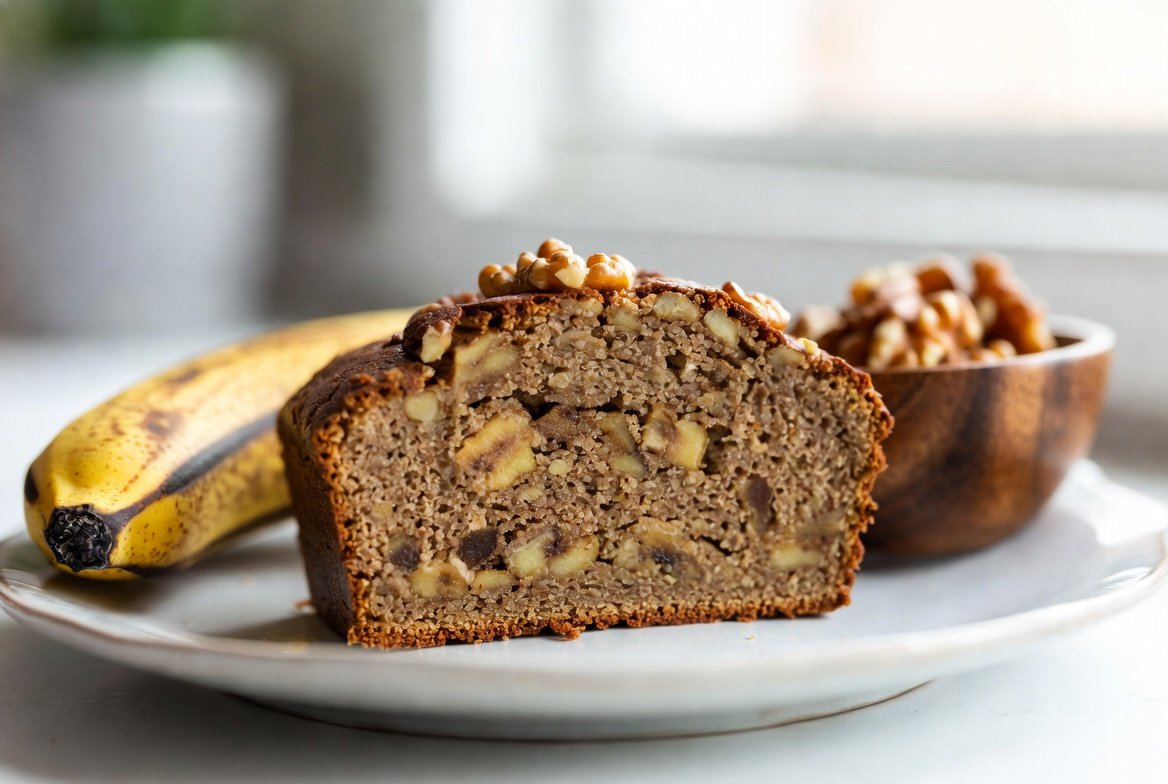
1. The Power of Overripe Bananas
As a banana ripens, its complex starches break down into simple sugars (fructose and glucose). For a low-sugar recipe, we want the “ugliest” bananas possible—black spots are your best friend. These provide the liquid gold of natural sweetness, reducing the need for added sweeteners while providing potassium and Vitamin B6.
2. Erythritol, Monk Fruit, and Stevia: The Trio of Success
Sugar does more than sweeten; it provides structure and browning. We recommend a Monk Fruit/Erythritol blend because it measures 1:1 with sugar and lacks the bitter aftertaste often associated with pure stevia. These sweeteners have a glycemic index of zero, meaning they do not impact blood glucose levels at all.
3. Flour Choice and Fiber Content
We use Whole Wheat Pastry Flour because it retains the bran and germ of the grain, adding essential fiber that slows sugar absorption. If you are following a Keto or strict low-carb diet, Almond Flour is an excellent substitute that adds healthy monounsaturated fats, though it results in a slightly denser, more “fudgy” crumb.
4. Moisture Without the Fat: Greek Yogurt
Traditional recipes use heavy amounts of butter or oil. By swapping a portion of that for Plain Greek Yogurt, we add moisture, a subtle tang that balances the sweetness, and a boost of protein. Protein is key for diabetics as it further blunts the rise of blood sugar.
The Master Recipe: Diabetic-Friendly Banana Bread
Yields: 1 Loaf (12 Slices) | Prep Time: 15 Mins | Bake Time: 55-65 Mins
Ingredients:
- 3-4 Large, Very Ripe Bananas: Must be heavily spotted or brown.
- 1/2 Cup Plain Greek Yogurt: 0% or 2% fat works best. (Substitute: Unsweetened Applesauce).
- 2 Large Eggs: Room temperature helps for a better rise.
- 1/4 Cup Melted Coconut Oil: Or avocado oil for a neutral flavor.
- 1 Teaspoon Pure Vanilla Extract: Avoid imitation flavorings.
- 3/4 Cup Monk Fruit/Erythritol Sweetener: Adjusted to your sweetness preference.
- 1 3/4 Cups Whole Wheat Pastry Flour: Sifted to avoid clumps.
- 1 Teaspoon Baking Soda: Our primary leavening agent.
- 1 Teaspoon Ground Cinnamon: High-quality Ceylon cinnamon is best.
- 1/4 Teaspoon Ground Nutmeg: For that “bakery-style” depth.
- 1/4 Teaspoon Salt: To brighten the natural banana notes.
- Optional Add-ins: 1/2 cup chopped walnuts or sugar-free dark chocolate chips.
Instructions:
- Preheat & Prep: Set your oven to 350°F (175°C). It is vital to let the oven reach full temperature before the bread goes in. Grease a 9×5 inch loaf pan and line the bottom with parchment paper.
- The Mash: In a large mixing bowl, mash the bananas with a fork until they reach a liquid-like consistency. A few small lumps are fine and add character to the bread.
- Wet Emulsion: Add the Greek yogurt, melted oil, eggs, vanilla, and sweetener. Whisk vigorously. You want the sweetener to begin dissolving into the wet ingredients to ensure a smooth texture.
- Dry Incorporation: In a separate bowl, whisk together the flour, baking soda, cinnamon, nutmeg, and salt.
- The Folding Technique: Gently pour the dry ingredients into the wet. Using a spatula, fold the mixture together. Stop the moment you see no more dry flour. Over-mixing activates the gluten, which will turn your bread into a “rubber” texture—we want light and tender!
- The Bake: Pour the batter into the pan. If using walnuts, sprinkle a few on top for visual appeal. Bake for 55 to 65 minutes.
- The Toothpick Test: Since low-sugar breads are moister, the center can stay wet. Insert a toothpick; it should come out with a few moist crumbs, but not raw batter.
- Cooling: Allow the loaf to sit in the pan for exactly 15 minutes. Then, move it to a wire cooling rack. Do not slice it yet! The structure of low-sugar bread sets as it cools. Waiting at least one hour will give you perfect, clean slices.
Troubleshooting: Why is my bread…?
…Too Dry?
This usually happens if the flour wasn’t measured correctly or the bread was overbaked. When measuring flour, use the “spoon and level” method rather than dipping the cup into the bag, which packs too much flour into the cup. Also, ensure your bananas were truly ripe; underripe bananas lack the moisture needed for this recipe.
…Sinking in the Middle?
This is often caused by opening the oven door too early or too often. The sudden drop in temperature causes the air bubbles to collapse before the structure is set. Another culprit is expired baking soda—always check your labels!
…Too Dense?
Dense bread is a sign of over-mixing. Remember: once the flour hits the wet ingredients, your whisking days are over. Switch to a spatula and use a gentle hand.
Customizing Your Vegiplate Loaf
One of the joys of this recipe is how easily it adapts to your personal taste. Here are three of our favorite variations:
- The Protein Powerhouse: Swap 1/4 cup of flour for a 1/4 cup of vanilla protein powder and add an extra tablespoon of yogurt.
- The “Elvis” Special: Swirl in 2 tablespoons of natural, unsweetened peanut butter into the batter before baking.
- The Autumn Spice: Add 1/2 teaspoon of ground ginger and replace the walnuts with pumpkin seeds (pepitas).
Storage and Meal Prep Tips
Because this bread is so moist, it stores beautifully. Wrap it tightly in beeswax wrap or parchment paper to maintain its texture. It will stay fresh at room temperature for 3 days or in the fridge for 7 days. For long-term storage, we recommend slicing the loaf and freezing individual portions with parchment paper between them. Simply pop a slice in the toaster for a “fresh-baked” taste any time of the week.
Frequently Asked Questions (FAQ)
Is this safe for Type 1 Diabetics?
While it is significantly lower in sugar, it still contains carbohydrates from the bananas and flour. Always count your macros and consult your doctor to adjust your insulin accordingly.
Can I use a different oil?
Yes! Avocado oil, light olive oil, or even melted unsalted butter will work. We prefer coconut oil for the subtle sweetness it provides without adding sugar.
Conclusion: A New Chapter in Healthy Baking
Baking is more than just following instructions; it’s about nurturing yourself and your family. By choosing this low-sugar banana bread, you’re proving that a health-conscious lifestyle can be filled with flavor, aroma, and satisfaction. This loaf isn’t a compromise—it’s an upgrade.
We can’t wait to see your Vegiplate creations! Share your photos on social media and tag us. Happy, healthy baking!