

Start your mornings right with these delicious freezer-friendly veggie breakfast burritos! Packed with protein, veggies, and cheesy goodness, they’re perfect for meal prep and busy weekdays. Ready in minutes from frozen!
The Ultimate Freezer-Friendly Veggie Breakfast Burritos: A Step-by-Step Guide
Mornings don’t have to be chaotic anymore! Imagine waking up to a hot, cheesy, nutrient-packed breakfast burrito ready in just two minutes. These freezer-friendly veggie breakfast burritos are the ultimate solution for busy professionals, parents on the go, or anyone who loves a savory morning start. With three delicious variations to choose from, you’ll never get bored of these easy homemade burritos that keep your taste buds excited all week long.
Why You’ll Love This Recipe
- Nutrient-packed: Unlike store-bought versions loaded with sodium and preservatives, these burritos are filled with fiber-rich vegetables, protein-packed eggs (or tofu), and healthy fats for a balanced breakfast.
- Budget-friendly: Make a batch of 12 at home for under $1.50 per serving compared to $5-$8 for a single fast-food burrito.
- Customizable: Swap ingredients to match your preferences – skip peppers, add jalapeños, or use your favorite cheese.
- Perfect portion control: Each complete meal comes wrapped in a handy package, making it easy to manage your morning energy intake.
Why You Need Freezer-Friendly Veggie Breakfast Burritos in Your Life
Before we dive into the kitchen, let’s look at why this specific recipe is a game-changer for your morning routine. These burritos solve several common breakfast problems while delivering maximum flavor and nutrition.
First, they eliminate the morning rush by providing a hot, ready-to-eat meal in minutes. Second, they’re significantly healthier than most fast-food options. Finally, they’re incredibly versatile – you can make them vegan, gluten-free, or adjust the spice level to your preference.
Ingredients for the Best Freezer-Friendly Veggie Breakfast Burritos
For the Tortillas
- 12 large flour tortillas (10-inch to 12-inch) – the gold standard for freezing
- OR whole wheat tortillas for extra fiber
- OR gluten-free tortillas (look for pliable brands with cassava flour)
For the Protein Base
- 8 large eggs (or 2 cups liquid egg whites for lower fat)
- OR 1 block (14 oz) firm tofu, crumbled (for vegan version)
- OR 2 cups cooked black beans or pinto beans
For the Vegetables
- 1 large red bell pepper, diced
- 1 medium onion, diced
- 2 cups fresh spinach, wilted and squeezed dry
- 1 medium zucchini, diced
- 1 cup corn kernels (fresh, frozen, or canned)
- 1 large sweet potato, peeled and diced (for roasted variation)
- 1 cup kale, stems removed and chopped
For the Cheese (choose one or mix)
- 2 cups shredded Monterey Jack cheese
- 1 cup crumbled feta cheese
- 1 cup shredded sharp cheddar cheese
Seasonings and Extras
- 1 tsp cumin
- 1/2 tsp smoked paprika
- 1/2 tsp chili powder
- 1 tsp dried oregano
- 1/2 tsp garlic powder
- Salt and pepper to taste
- 1 tbsp olive oil
- 1/4 cup milk or cream (for eggs)
- 1 tbsp nutritional yeast (for vegan version)
- 1 tsp black salt/kala namak (for vegan version)
Step-by-Step Instructions for Perfect Freezer-Friendly Veggie Breakfast Burritos
Prepare the Vegetables
First, chop all your vegetables into small, even pieces. For the roasted root variation, toss diced sweet potatoes with a little oil, salt, and pepper, then roast at 400°F (200°C) for 20-25 minutes until caramelized. Meanwhile, sauté onions and peppers in olive oil until soft and translucent.
For leafy greens, wilt spinach or kale in a pan and squeeze out all excess moisture. If using zucchini, sauté until just tender. For the Southwestern variation, add corn to the sautéed vegetables.
Cook the Protein
For scrambled eggs: Whisk eggs with milk or cream, salt, and pepper. Cook in a non-stick pan over medium-low heat, stirring constantly, until softly scrambled (they’ll finish cooking when reheated).
For tofu scramble: Crumble firm tofu into small pieces. Sauté with turmeric, nutritional yeast, black salt, and a little oil until golden and slightly crispy.
For bean version: Mash black beans slightly with a fork and season with cumin and chili powder.
Cool Everything Completely
Spread all cooked ingredients on large baking sheets or plates in a single layer. Let them cool to room temperature for 15-20 minutes. This step is crucial – hot fillings will create steam that makes tortillas soggy in the freezer.
Set Up Your Assembly Station
Clear a large workspace and lay out all your ingredients: tortillas, cheese, cooled fillings, and 12 sheets of aluminum foil or parchment paper. Having everything ready will make the rolling process much easier.
Build Your Burritos
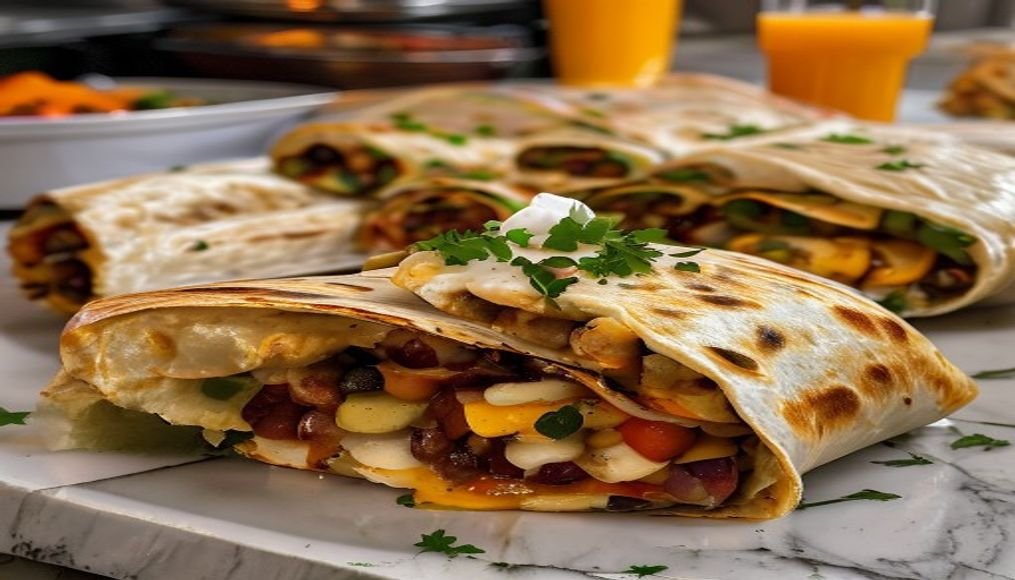
Place a tortilla on your workspace. Sprinkle 2 tablespoons of cheese in the center – this creates a moisture barrier. Add about 1/2 cup of your egg/veggie mixture in a line down the center. Remember: don’t overfill or your burrito will burst!
Fold in the left and right sides of the tortilla. Holding those sides in, use your thumbs to bring the bottom flap up and over the filling. Tuck the filling in tightly as you roll the burrito away from you. Place seam-side down on a square of aluminum foil and wrap tightly to prevent freezer burn.
Pro Tips for the Best Freezer-Friendly Veggie Breakfast Burritos
Prevent Soggy Tortillas
- Cool completely: Never assemble burritos with hot fillings. Steam trapped inside creates soggy tortillas.
- Use cheese as a barrier: Sprinkle cheese directly on the tortilla before adding fillings to repel moisture.
- Avoid watery veggies: Cook down spinach, tomatoes, and other high-moisture vegetables before adding to burritos.
- Wrap tightly: Use aluminum foil and squeeze out all air to prevent freezer burn and maintain texture.
Make Ahead for Maximum Convenience
- Prep fillings in advance: Cook all vegetables and proteins the day before, then cool and store in the fridge.
- Freeze in batches: Make 3-4 burritos at a time to keep the process manageable.
- Label everything: Write the date and variation on each foil packet for easy identification later.
- Double the batch: These freeze beautifully, so make 24 instead of 12 for even more convenience.
How to Store and Reheat Your Freezer-Friendly Veggie Breakfast Burritos
Freezer Storage
Once wrapped in foil, place all burritos in a large zip-top freezer bag. Squeeze out as much air as possible before sealing. These will keep for 3 months in the freezer without losing quality.
For fridge storage, wrap burritos tightly in plastic wrap and store for up to 3 days. However, the texture is best when frozen and reheated from frozen.
Reheating Methods
Microwave Method (Fastest – 2 Minutes)
- Unwrap the foil (metal in the microwave is dangerous!)
- Wrap the burrito in a damp paper towel to steam the tortilla
- Microwave on high for 90 seconds to 2 minutes, flipping halfway through
- Let it sit for 1 minute before eating (the inside will be very hot!)
Oven Method (Best Texture – 30 Minutes)
- Keep the burrito wrapped in foil
- Preheat oven or toaster oven to 350°F (175°C)
- Bake for 30 minutes
- Unwrap and enjoy the perfect texture
Air Fryer Method (Crispy Exterior – 10 Minutes)
- Unwrap the foil and place burrito directly in air fryer basket
- Cook at 350°F (175°C) for 8-10 minutes, flipping halfway
- Check that the cheese is melted and tortilla is crispy
3 Delicious Variations of Freezer-Friendly Veggie Breakfast Burritos
Southwestern Sunrise Burrito
Ideally paired with a side of salsa for extra flavor.
- Filling: Soft scrambled eggs, black beans (rinsed and drained), diced red bell pepper, sautéed onions, corn, and Monterey Jack cheese
- Seasoning: 1 tsp cumin, 1/2 tsp smoked paprika, pinch of chili powder
- Why it works: The corn and beans add great texture contrast to the soft eggs
Green Goddess Burrito
Fresh, herbaceous, and packed with iron for a lighter morning option.
- Filling: Egg whites (or whole eggs), sautéed spinach (excess water removed), diced zucchini, chopped scallions, and crumbled feta cheese
- Seasoning: Dried oregano, garlic powder, and a squeeze of lemon juice in the spinach
- Why it works: Feta adds a salty punch that cuts through the richness of the egg
Roasted Root Burrito
Perfect for cold winter mornings when you need something hearty and warming.
- Filling: Scrambled eggs, roasted sweet potato cubes (caramelized), sautéed kale, and sharp cheddar cheese
- Seasoning: Salt, pepper, and a dash of onion powder
- Why it works: The sweetness of the potato pairs perfectly with the sharpness of the cheddar
Serving Suggestions for Your Freezer-Friendly Veggie Breakfast Burritos
These burritos are complete meals on their own, but here are some delicious ways to serve them:
- Classic breakfast: Serve with fresh salsa, avocado slices, and a dollop of Greek yogurt
- Southwestern style: Top with pico de gallo, sour cream, and a sprinkle of cilantro
- Breakfast sandwich style: Serve with a side of roasted potatoes or hash browns for a heartier meal
Frequently Asked Questions
Can I make these burritos ahead of time?
Absolutely! In fact, these are designed to be made ahead. Assemble and freeze them up to 3 months in advance. They’re perfect for meal prepping busy weeks.
Are these burritos vegan?
The base recipe uses eggs, but you can easily make vegan versions by using tofu scramble instead of eggs and omitting the cheese (or using vegan cheese alternatives).
How long do these keep in the freezer?
When properly wrapped in foil and stored in a freezer bag, these burritos will maintain their quality for up to 3 months in the freezer.
Can I reheat these without foil?
Yes, but the texture won’t be as good. The foil helps maintain moisture during reheating. If you must reheat without foil, use the oven or air fryer methods for best results.