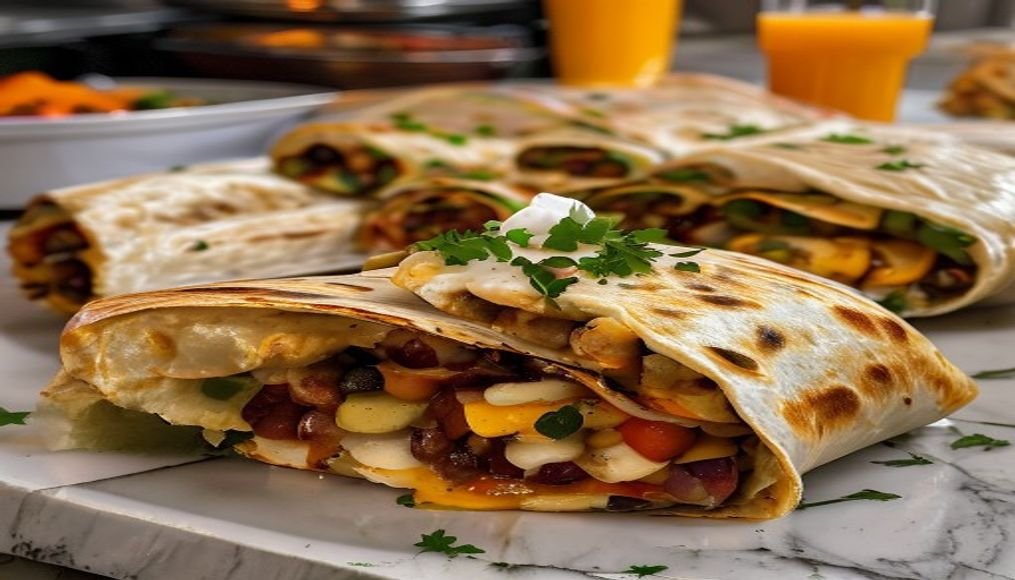

Start your mornings right with these delicious freezer-friendly veggie breakfast burritos! Packed with protein, veggies, and cheesy goodness, they’re perfect for meal prep and busy weekdays. Ready in minutes from frozen! Choose from three flavor variations: Classic Southwest, Mediterranean, and Spicy Southwest to keep your breakfasts exciting all week.
Freezer-Friendly Veggie Breakfast Burritos: A Complete Step-by-Step Guide
Mornings don’t have to be chaotic anymore. Imagine waking up to a hot, cheesy, nutrient-packed breakfast burrito ready in just minutes. These freezer-friendly veggie breakfast burritos are the ultimate solution for busy professionals, parents on the go, or anyone who loves a savory morning start. With three delicious variations to choose from, you’ll never get bored of these easy homemade burritos that keep your mornings smooth and delicious all week long.
Whether you’re meal prepping for the week or just want a quick breakfast option, this guide will walk you through everything you need to know—from ingredient selection to freezing techniques. You’ll learn how to customize these burritos to your taste preferences while ensuring they stay fresh and delicious in the freezer for up to three months.
Why You’ll Love This Recipe
- Nutrient-packed: Unlike store-bought versions loaded with sodium and preservatives, these burritos are filled with fiber-rich vegetables, protein-packed eggs (or tofu), and healthy fats for a balanced breakfast that will keep you full for hours.
- Budget-friendly: Make a batch of 12 at home for under $1.50 per serving—far more affordable than the $5–$8 for a single fast-food burrito. Plus, you control the ingredients and portion sizes.
- Customizable: Swap ingredients to match your preferences—skip peppers, add jalapeños, or use your favorite cheese. The recipe works with any dietary need, from vegan to gluten-free to low-carb options.
- Perfect portion control: Each complete meal comes wrapped in a handy package, making it easy to manage your morning energy intake. No more overeating or skipping breakfast because you’re in a rush.
- Time-saving: Spend just 30 minutes preparing a batch, then freeze them for up to three months. In the morning, you’ll have a hot, ready-to-eat meal in just 3-5 minutes from frozen.
- Family-friendly: Kids love these burritos too! The cheesy, savory flavors appeal to picky eaters, and you can sneak in extra vegetables without them noticing.
Why You Need Freezer-Friendly Veggie Breakfast Burritos in Your Life
Before we dive into the kitchen, let’s look at why this recipe is a game-changer for your morning routine. These burritos solve several common breakfast problems while delivering maximum flavor and nutrition.
The Morning Rush Solution
How many times have you hit the snooze button one too many times, only to rush out the door without breakfast? These burritos eliminate that stress by providing a hot, ready-to-eat meal in minutes. Simply microwave from frozen for 2-3 minutes, and you’re good to go. No more stopping at a drive-thru or settling for an unhealthy snack.
A Healthier Alternative to Fast Food
Most fast-food breakfast burritos contain over 500 calories, 20 grams of fat, and 1,000+ milligrams of sodium. Our homemade version delivers all the flavor with significantly better nutrition:
- Lower in calories: Approximately 300-350 calories per burrito (vs. 500+ from fast food)
- Less sodium: Around 400-500mg per burrito (vs. 1,000+mg from fast food)
- More fiber: 6-8 grams per burrito (vs. 2-3 grams from fast food)
- No preservatives: Just real, wholesome ingredients you can pronounce
Versatility for Every Dietary Need
These burritos are incredibly versatile—you can make them vegan, gluten-free, or adjust the spice level to your preference. Here’s how:
- Vegan: Use tofu instead of eggs and dairy-free cheese
- Gluten-free: Choose certified gluten-free tortillas made with cassava or almond flour
- Low-carb: Use low-carb tortillas or collard green wraps
- Spicy: Add jalapeños, hot sauce, or cayenne pepper
- Mild: Skip the peppers and use mild cheddar cheese
Three Delicious Variations to Keep Your Breakfasts Exciting
While the basic recipe is delicious on its own, these three variations will keep your breakfasts exciting all week. Each uses the same basic assembly method but with different flavor profiles.
1. Classic Southwest Veggie Burrito
Ingredients: Eggs, black beans, bell peppers, onions, corn, Monterey Jack cheese, cumin, chili powder
Flavor Profile: A timeless combination of savory eggs, smoky spices, and melted cheese. The black beans add protein and fiber, while the corn provides natural sweetness.
Serving Suggestion: Serve with salsa and avocado slices for extra creaminess. Perfect with a side of fresh fruit or a cup of coffee.
2. Mediterranean Veggie Burrito
Ingredients: Eggs or tofu, spinach, kale, feta cheese, sun-dried tomatoes, kalamata olives, oregano, garlic
Flavor Profile: Bright, fresh flavors with a touch of tang from the feta and olives. The sun-dried tomatoes add a sweet, concentrated tomato flavor that pairs perfectly with the greens.
Serving Suggestion: Serve with a dollop of tzatziki sauce or hummus. Pair with a cup of Greek yogurt for extra protein.
3. Spicy Southwest Veggie Burrito
Ingredients: Eggs, pinto beans, bell peppers, onions, jalapeños, pepper jack cheese, smoked paprika, cayenne pepper
Flavor Profile: A fiery kick with layers of smoky, spicy, and savory flavors. The jalapeños and pepper jack cheese bring the heat, while the smoked paprika adds depth.
Serving Suggestion: Serve with sour cream or Greek yogurt to cool the heat. Pair with a refreshing fruit salad to balance the spices.
Ingredients for the Best Freezer-Friendly Veggie Breakfast Burritos
This recipe makes 12 burritos, perfect for a week of breakfasts or to share with friends. The ingredients are divided into categories for easy shopping and preparation.
For the Tortillas
- 12 large flour tortillas (10-inch to 12-inch)—the gold standard for freezing. Look for burrito-sized tortillas that are pliable and won’t crack when wrapped.
- Whole wheat tortillas: For extra fiber and a nuttier flavor. These add about 3 grams of fiber per tortilla compared to white flour.
- Gluten-free tortillas: Choose pliable brands made with cassava flour, almond flour, or brown rice flour. Ensure they’re certified gluten-free if needed.
- Low-carb tortillas: For a lower-carb option, use tortillas made with almond or coconut flour. These typically have 3-5 grams of net carbs per tortilla.
For the Protein Base
- 8 large eggs—equivalent to 1½ cups of beaten eggs. For a lower-fat option, use 2 cups of liquid egg whites or a combination of eggs and egg whites.
- Tofu option: 1 block (14 oz) firm tofu, crumbled. Press the tofu for 15 minutes to remove excess water before crumbling. This adds plant-based protein and a satisfying texture.
- Beans: 2 cups cooked black beans or pinto beans. Canned beans work well—just rinse and drain them first. For extra flavor, season the beans with garlic powder, cumin, and salt before adding to the burritos.
- Alternative proteins: For a heartier burrito, add 1 cup of cooked quinoa or 1 cup of cooked lentils. These add extra protein and fiber without changing the flavor significantly.
For the Vegetables
Choose 4-5 cups of vegetables total, adjusting based on your preferences. Here are some great options:
- Bell peppers: 1 large red bell pepper, diced. Red peppers are sweeter and add beautiful color. You can also use green, yellow, or orange peppers for different flavor profiles.
- Onion: 1 medium onion, diced. Yellow or white onions work best for their mild flavor. For a sweeter option, use Vidalia onions.
- Leafy greens: 2 cups fresh spinach, wilted and squeezed dry. You can also use kale, Swiss chard, or arugula. Wilt the greens first to remove excess water and prevent soggy burritos.
- Zucchini: 1 medium zucchini, diced. This adds a nice texture and absorbs flavors well. For a firmer texture, sauté the zucchini before adding to the burritos.
- Corn: 1 cup corn kernels. Use fresh corn in the summer for the best flavor, or frozen corn (no need to thaw) for convenience. Canned corn works too, but rinse it well to remove excess sodium.
- Sweet potato: 1 large sweet potato, peeled and diced. Roast the sweet potato first for a caramelized flavor, or sauté for a softer texture. This adds natural sweetness and extra fiber.
- Mushrooms: 1 cup sliced mushrooms. Cremini or white mushrooms work best. Sauté them until golden brown for a meaty texture.
- Tomatoes: 1 cup diced tomatoes. Use fresh tomatoes in season, or canned diced tomatoes (drained) for convenience. For a Mediterranean twist, use sun-dried tomatoes.
- Jalapeños: 2-3 jalapeños, seeded and diced. Add them to the Spicy Southwest variation for a kick of heat. For less heat, remove the seeds and membranes.
For the Cheese (choose one or mix)
- Monterey Jack cheese: 2 cups shredded. This melts beautifully and has a mild, creamy flavor that pairs well with most vegetables.
- Feta cheese: 1 cup crumbled. For the Mediterranean variation, feta adds a tangy, salty flavor that cuts through the greens.
- Sharp cheddar cheese: 1 cup shredded. This adds a bold, sharp flavor that works well in the Classic Southwest variation.
- Pepper Jack cheese: 1 cup shredded. For extra heat, use this in the Spicy Southwest variation. It melts beautifully and adds a spicy kick.
- Dairy-free cheese: Use your favorite plant-based shredded cheese for a vegan option. Look for brands that melt well, like Miyoko’s or Violife.
- Goat cheese: ½ cup crumbled. For a tangy twist, add goat cheese to the Mediterranean variation.
Seasonings and Extras
- Spices: 1 tsp cumin, ½ tsp smoked paprika, ½ tsp chili powder. These spices add depth and smokiness to the burritos. Adjust to taste—add more chili powder for heat or more cumin for earthiness.
- Salt and pepper: To taste. Season the vegetables and protein mixture well to enhance the flavors.
- Garlic: 3 cloves, minced. Fresh garlic adds a bright, aromatic flavor. For convenience, use 1 tsp garlic powder instead.
- Hot sauce: 2 tbsp. Add this to the filling or serve on the side for extra heat.
- Fresh herbs: 2 tbsp chopped cilantro, parsley, or chives. Add these at the end for a burst of freshness.
- Salsa: ½ cup. Stir this into the filling or serve on the side for extra flavor and moisture.
Step-by-Step Instructions for Perfect Burritos Every Time
Step 1: Prep Your Vegetables
Before you start cooking, prep all your vegetables. Dice, chop, and measure everything so it’s ready to go. This will make the cooking process much smoother and faster.
Pro Tip: If you’re short on time, buy pre-diced vegetables or use frozen mixed vegetables. Just thaw and drain them before using.
For the leafy greens (spinach, kale, etc.), wilt them first by sautéing in a dry pan for 2-3 minutes until they’re soft and the water has evaporated. Squeeze out any excess water with a clean towel or paper towels to prevent soggy burritos.
Step 2: Cook Your Protein
In a large skillet, heat 1 tbsp of oil (olive oil, avocado oil, or butter) over medium heat. Add the diced onion and bell pepper, and sauté for 3-4 minutes until softened. Add the garlic and cook for another 30 seconds until fragrant.
Add the remaining vegetables (zucchini, corn, sweet potato, etc.) and cook for 5-7 minutes, stirring occasionally, until the vegetables are tender. Season with salt, pepper, and half of the spices (cumin, smoked paprika, chili powder).
Push the vegetables to one side of the skillet and pour the beaten eggs into the empty space. Scramble the eggs until just set, then mix them with the vegetables. Alternatively, add the crumbled tofu or cooked beans and heat through.
Pro Tip: For extra flavor, deglaze the pan with ¼ cup of vegetable broth or water after cooking the vegetables. This will lift any browned bits and add depth to the filling.
Step 3: Assemble the Burritos
Lay out a tortilla on a clean surface. Spoon about ½ to ⅔ cup of the filling onto the center of the tortilla, leaving about 1 inch of space on all sides. Sprinkle with cheese (if using) and any fresh herbs.
Fold the sides of the tortilla inward, then fold the bottom up and over the filling. Roll tightly to create a burrito, tucking in the sides as you go. The goal is to create a compact, secure package that won’t unravel during freezing or reheating.
Pro Tip: For extra security, wrap each burrito in parchment paper or foil before freezing. This makes it easier to reheat and prevents freezer burn.
Step 4: Freeze for Later
Place the assembled burritos on a parchment-lined baking sheet, seam-side down. Freeze for 1-2 hours, or until solid. This prevents the burritos from sticking together.
Transfer the frozen burritos to a freezer-safe bag or airtight container. Label with the date and contents, and store in the freezer for up to 3 months.
Pro Tip: To prevent freezer burn, wrap each burrito tightly in plastic wrap before placing it in the freezer bag. Squeeze out as much air as possible before sealing the bag.
Step 5: Reheat from Frozen
When you’re ready to eat, there are several ways to reheat your burrito:
- Microwave: Place the burrito on a microwave-safe plate and heat for 2-3 minutes, flipping halfway through. For extra crispiness, microwave for 1 minute, then crisp in a dry skillet for 1-2 minutes.
- Oven: Preheat the oven to 375°F (190°C). Wrap the burrito in foil and bake for 20-25 minutes, or until heated through. For a crispy exterior, unwrap and bake for an additional 5 minutes.
- Toaster Oven: Wrap the burrito in foil and heat at 350°F (175°C) for 15-20 minutes. This method works well for a single burrito.
- Air Fryer: Place the burrito in the air fryer basket and cook at 350°F (175°C) for 8-10 minutes, flipping halfway through. This method gives the burrito a crispy exterior without drying it out.
Pro Tip: For the best texture, let the burrito sit at room temperature for 5-10 minutes before reheating. This helps the filling thaw slightly, resulting in more even heating.
Meal Prep Tips for Success
Batch Cooking
This recipe is perfect for batch cooking. Here’s how to make the most of your time:
- Prep Ahead: Chop all your vegetables and measure out your spices the night before. Store them in airtight containers in the fridge.
- Cook in Batches: If you’re making multiple variations, cook the fillings in separate batches to avoid mixing flavors. Use the same skillet but clean it between batches.
- Assemble Quickly: Set up an assembly line with tortillas, fillings, and cheese. This makes the process go much faster and ensures consistent burritos.
- Freeze Properly: Freeze the burritos on a baking sheet first to prevent sticking, then transfer to a freezer bag. This step is crucial for easy reheating later.
- Label Everything: Use masking tape and a marker to label your freezer bags with the date, contents, and reheating instructions. This makes it easy to grab and go in the morning.
Storage and Reheating
Proper storage is key to keeping your burritos fresh and delicious. Here’s what you need to know:
- Refrigerator: If you plan to eat the burritos within 3-4 days, store them in an airtight container in the fridge. Reheat in the microwave for 1-2 minutes.
- Freezer: For longer storage, freeze the burritos as directed above. They’ll keep for up to 3 months in the freezer. To prevent freezer burn, wrap each burrito tightly in plastic wrap before freezing.
- Reheating: Always reheat from frozen for the best texture. Microwaving is the quickest method, but oven or air fryer methods yield crispier results. Avoid thawing before reheating, as this can make the tortilla soggy.
- Reheating Multiple Burritos: If you’re reheating several burritos at once, arrange them in a single layer on a microwave-safe plate with a damp paper towel on top. This helps them heat evenly and prevents drying out.
Serving Suggestions
These burritos are delicious on their own, but you can elevate them with these serving suggestions:
- Toppings: Add avocado slices, salsa, Greek yogurt, sour cream, or hot sauce for extra flavor and texture.
- Sides: Serve with fresh fruit, a side salad, or roasted sweet potato wedges for a balanced meal.
- Sauces: Drizzle with tahini sauce, pesto, or a simple yogurt sauce for extra creaminess.
- Dipping: Serve with extra salsa, guacamole, or hummus for dipping.
Frequently Asked Questions
Can I make these burritos ahead of time?
Absolutely! In fact, these burritos are designed to be made ahead of time. Assemble and freeze them for up to 3 months. They’re perfect for meal prep and busy mornings.
How long do these burritos last in the freezer?
When stored properly in an airtight container or freezer bag, these burritos will last for up to 3 months in the freezer. For the best quality, use them within 1-2 months.
Can I reheat these burritos in the microwave?
Yes! Microwaving is the quickest and easiest way to reheat these burritos. Simply place the burrito on a microwave-safe plate and heat for 2-3 minutes, flipping halfway through. For extra crispiness, microwave for 1 minute, then crisp in a dry skillet for 1-2 minutes.
Can I freeze these burritos without cooking the filling first?
No, it’s best to cook the filling before assembling and freezing the burritos. Raw vegetables and uncooked eggs won’t hold up well in the freezer and can lead to soggy or unevenly cooked burritos.
What’s the best way to thaw these burritos before reheating?
For the best texture, reheat these burritos directly from frozen. Thawing can make the tortilla soggy and lead to uneven heating. If you must thaw, place the burrito in the fridge overnight, then reheat in the oven or air fryer.
Can I make these burritos vegan?
Yes! Simply swap the eggs for crumbled tofu and use dairy-free cheese. You can also add extra vegetables like mushrooms or spinach for a heartier filling.
How do I prevent my burritos from getting soggy?
To prevent soggy burritos, follow these tips:
- Wilt leafy greens before adding them to the filling to remove excess water.
- Cook the filling until most of the moisture has evaporated.
- Use dry tortillas—don’t use tortillas that are already slightly damp.
- Wrap the burritos tightly in plastic wrap before freezing to prevent freezer burn and moisture loss.
- Reheat from frozen using a method that crisps the exterior, like the oven or air fryer.
Can I use these burritos for lunch or dinner?
Absolutely! While these burritos are designed as a breakfast option, they make a great lunch or dinner too. Serve with a side salad or roasted vegetables for a balanced meal.
What’s the best way to customize these burritos to my taste?
These burritos are highly customizable. Here are some ideas to make them your own:
- Protein: Swap eggs for tofu, tempeh, or cooked lentils. Add cooked chicken, turkey, or sausage for a meat-based option.
- Vegetables: Use your favorite vegetables or whatever you have on hand. Some great options include mushrooms, tomatoes, avocado, or roasted butternut squash.
- Cheese: Use your favorite cheese or a combination of cheeses. Some great options include cheddar, Monterey Jack, pepper jack, feta, or goat cheese.
- Spices: Adjust the spices to your taste. Add more chili powder for heat, more cumin for earthiness, or more smoked paprika for smokiness.
- Sauces: Stir in your favorite sauce or drizzle on top before serving. Some great options include salsa, hot sauce, pesto, or tahini sauce.
Final Thoughts: Why These Burritos Will Change Your Mornings
Freezer-friendly veggie breakfast burritos are more than just a convenient breakfast option—they’re a lifestyle upgrade. By spending just 30 minutes on the weekend, you can set yourself up for a week of delicious, nutritious breakfasts that will keep you full and energized until lunchtime.
These burritos solve the age-old problem of what to eat for breakfast when you’re short on time. They’re healthier than fast food, more affordable than store-bought options, and infinitely customizable to your taste preferences. Plus, they’re a great way to use up leftover vegetables and reduce food waste.
Whether you’re a busy professional, a parent on the go, or just someone who loves a good breakfast burrito, this recipe is sure to become a staple in your meal prep routine. So why not give it a try? Your mornings will thank you.
Remember, the key to success is in the details—prep your vegetables ahead of time, cook the filling until it’s dry, wrap the burritos tightly, and reheat them properly. Follow these tips, and you’ll have the best freezer-friendly veggie breakfast burritos you’ve ever tasted.
Happy cooking!