
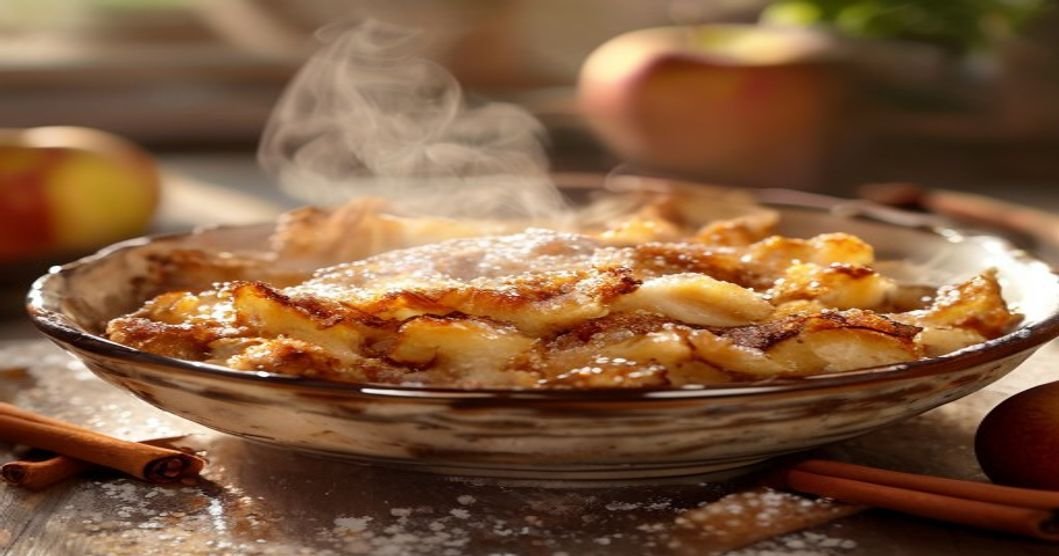
The 15-Minute Vegan Apple Crisp for Sudden Sweet Cravings

Picture this: It’s 8 PM, you’ve just finished dinner, and suddenly—BAM—a wave of sweet cravings hits you like a rogue dessert truck. You don’t want a full-blown baking session, but you do want something warm, cozy, and just sweet enough to satisfy that nagging urge. Enter: the 15-Minute Vegan Apple Crisp. Yes, you read that right—15 minutes. No fancy ingredients, no guilt, and no oven preheating marathon. Just crispy oats, tender apples, and a hint of cinnamon to wrap you in a hug from the inside out.
This isn’t just another “healthy” dessert that tastes like cardboard (we’ve all been there). This is the kind of recipe your taste buds will throw a party for, and your heart will thank you for. Whether you’re a full-time vegan, a curious flexitarian, or just someone who loves a good apple crisp without the dairy drama, this recipe is your new best friend. So, grab your mixing bowl, your favorite cozy sweater, and let’s dive into the magic of speedy vegan apple crisp.
Why This Recipe is a Game-Changer

Let’s talk about why this 15-minute vegan apple crisp deserves a spot in your recipe rotation:
- Speed Demon: No waiting hours for dough to chill or apples to soften. We’re talking 15 minutes max—from counter to craving-killer.
- Minimal Ingredients: You probably already have most of these in your pantry. No specialty stores, no weird substitutes, just simple, wholesome stuff.
- Nutrient-Packed: Apples bring fiber and vitamins, oats add heart-healthy whole grains, and a touch of maple syrup gives natural sweetness without the crash.
- Customizable: Swap apples for pears, add nuts or seeds, or sprinkle in some chocolate chips. The base is flexible, so get creative!
- Comfort in a Bowl: Warm, spiced, and just sweet enough—it’s like a hug in dessert form. Perfect for those nights when you need a little pick-me-up.
Still not convinced? How about this: You can make it in one bowl, with one spoon, and no dishes to wash afterward. Microwave or stovetop? Your call. Let’s break it down.
What You’ll Need: The Simple Ingredient List
Before we dive into the method, let’s talk ingredients. This recipe is all about simplicity, so here’s what you’ll need (with easy swaps if you’re missing something):
For the Apple Filling:
- 2 medium apples (about 2 cups chopped)—Granny Smith for tartness or Honeycrisp for sweetness. Peel them if you’re feeling fancy, but it’s optional!
- 1 tbsp lemon juice (to keep the apples from browning and add a little zing)
- 1 tbsp maple syrup or agave (adjust to taste)
- 1 tsp cinnamon (the star of the show)
- ½ tsp vanilla extract (optional but highly recommended)
- Pinch of salt (to balance the flavors)
For the Crisp Topping:
- ½ cup rolled oats (gluten-free if needed)
- 2 tbsp flour (all-purpose, almond, or coconut flour work)
- 2 tbsp chopped nuts or seeds (walnuts, pecans, almonds, or pumpkin seeds—whatever you like!)
- 1 tbsp coconut oil (melted) or vegan butter
- 1 tbsp maple syrup or brown sugar
- ½ tsp cinnamon
- Pinch of salt
Pro Tip: No oats? Use crushed cereal, granola, or even a sprinkle of crushed graham crackers. No nuts? Skip ‘em! This recipe is all about flexibility.
Method 1: Stovetop Apple Crisp (My Personal Favorite)

This is the method I use 90% of the time because it’s fast, hands-off, and foolproof. Here’s how to do it:
Step 1: Prep the Apples
Chop your apples into small, even pieces (about ½-inch chunks). Toss them in a bowl with lemon juice, maple syrup, cinnamon, vanilla, and a pinch of salt. Stir well to coat. Set aside while you make the topping.
Step 2: Make the Crisp Topping
In the same bowl (yes, we’re keeping it simple!), mix together the oats, flour, chopped nuts/seeds, cinnamon, and salt. Drizzle in the melted coconut oil and maple syrup, then stir until everything is evenly coated and crumbly. If it’s too dry, add a splash more syrup or oil. If it’s too wet, add a bit more flour.
Step 3: Cook the Apples
Heat a small saucepan over medium-low heat. Add the apple mixture and cook for about 5-7 minutes, stirring occasionally, until the apples are softened but still holding their shape. They should be tender but not mushy.
Step 4: Assemble & Toast the Topping
Transfer the cooked apples to a small bowl or ramekin. Sprinkle the crisp topping evenly over the top. Place the bowl under the broiler for 2-3 minutes (or use a kitchen torch if you’re fancy) to lightly toast the topping. Keep a close eye so it doesn’t burn!
Alternatively, you can skip the broiler and just let the topping sit on the warm apples for